Why My Git Bash is Slow: Reasons and Solutions

Git Bash is a popular terminal application for interacting with Git repositories. However, users occasionally experience slow performance, which can hinder productivity. If you’re facing this issue, there are several reasons why Git Bash might be slow, as well as solutions to speed it up. Below, we explore common causes and offer effective solutions, including some of the most favored commands.

Common Reasons for Git Bash Slowness

1. Large Repository Size

A large Git repository with many commits, branches, and files can cause Git Bash to slow down. The terminal needs to load all this information, which may take time, especially if the repository is not optimized.

2. Unoptimized Git Data

Over time, Git stores unnecessary or redundant information in the .git directory. If this data is not cleaned up, it can cause slowdowns when running Git commands.

3. Excessive Git Hooks or Custom Scripts

Custom hooks, scripts, or processes tied to Git operations can also slow down performance. These may run in the background during commands like git commit or git push, especially if they are not optimized.

4. Hardware Limitations

Git Bash performance can be affected by the hardware capabilities of your machine. Older hardware or insufficient resources (such as low disk space or memory) can lead to sluggishness.

Solutions to Improve Git Bash Performance

1. Run Git Garbage Collection (git gc)

git gc

One of the most effective ways to improve Git performance is to run the Git garbage collection command. This will clean up unnecessary files, optimize the repository, and reduce its size.

2. Check Repository Integrity with git fsck

Git’s built-in fsck command checks the integrity of the Git database and identifies any corrupted objects or files. Running this command can help resolve issues that may be affecting performance.

git fsck

This command will validate your Git repository’s integrity and ensure that everything is in order, which could improve Git’s performance.

3. Limit the Number of Git Hooks

If your repository uses many hooks, consider optimizing them. Remove unnecessary hooks or split them into smaller, more efficient scripts. You can also disable hooks temporarily to test whether they are causing slowness.

4. Optimize Your .gitconfig File

Review your Git configuration files (.gitconfig) for any inefficient settings. For instance, turning off certain features like auto-completion or limiting the amount of information Git Bash displays could help speed things up.

5. Use a Lighter Shell

If your Git Bash environment includes custom themes, plugins, or integrations, consider switching to a lighter shell configuration. This can help reduce the overhead that causes performance issues.

6. Update Git and Git Bash

Ensure that you are using the latest version of Git and Git Bash. Developers regularly release performance improvements and bug fixes, so keeping your tools updated can resolve some speed issues.

7. Increase System Resources

If you’re running Git on an older machine, upgrading your hardware can significantly improve Git Bash’s performance. More RAM or a faster SSD can help with file access and repository loading times.

Conclusion

Git Bash may experience slowness for various reasons, including large repository sizes, unoptimized Git data, and hardware limitations. However, solutions like running git gc, checking repository integrity with git fsck, and cleaning up your Git environment can resolve most performance issues. By adopting these solutions, you can enjoy a faster, more efficient Git experience.
How to Add Your Own Python to Apache Environment on Laragon

If you’re using Laragon to develop web applications and need to run Python scripts through Apache, you might encounter an issue where Python isn’t recognized in your environment. Don’t worry—fixing it is simple! Here’s a step-by-step guide to adding Python to Laragon’s Apache environment, explained in an easy and straightforward way.

Why Doesn’t Python Work?

When Apache tries to run Python, it looks for it in a specific list of folders (called the “PATH”). If Python’s folder isn’t on this list, Apache won’t recognize it. Our job is to show Apache where Python is located so it can use it properly.

Step 1: Find Your Python Path

First, we need to find where Python is installed:

  1. Open File Explorer.
  2. Look for a folder named something like:
    • C:\Python39 (for Python 3.9)
    • C:\Python311 (for Python 3.11)
  3. Note down this folder path.

Step 2: Open Laragon’s Apache Configuration

Now, let’s update Laragon’s Apache configuration so it recognizes Python:

  1. Go to your Laragon folder (usually D:\laragon\).
  2. Open this folder: D:\laragon\etc\apache2\.
  3. Find a file named fcgid.conf and open it in a text editor (like Notepad++).

Step 3: Add Python to Apache’s Environment

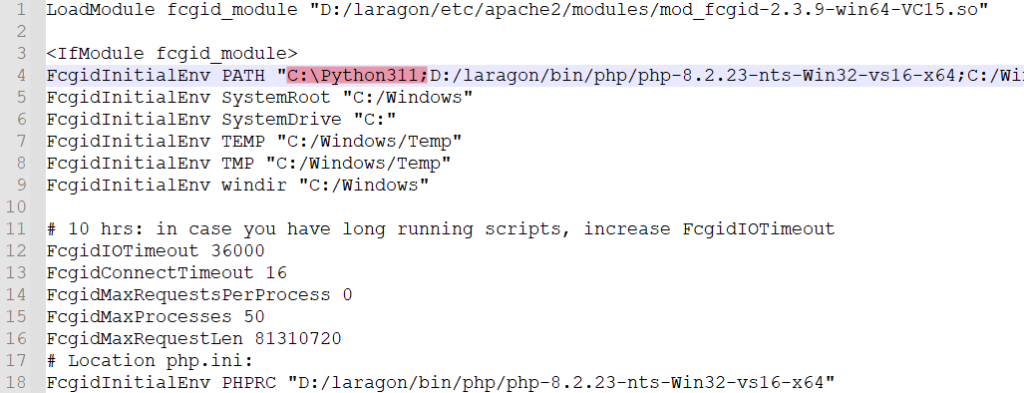
Inside the fcgid.conf file, find this line:

FcgidInitialEnv PATH

It should already contain some paths for PHP and system folders. Add your Python path to it. For example:

Before:

FcgidInitialEnv PATH "D:/laragon/bin/php/php-8.2.23-nts-Win32-vs16-x64;C:/Windows/system32;C:/Windows;C:/Windows/System32/Wbem;"

After:

FcgidInitialEnv PATH "C:\Python311;D:/laragon/bin/php/php-8.2.23-nts-Win32-vs16-x64;C:/Windows/system32;C:/Windows;C:/Windows/System32/Wbem;"

This tells Apache where to find Python.

Step 4: Save and Restart Apache

  1. Save the fcgid.conf file.
  2. Restart Apache by opening Laragon and clicking Menu > Apache > Restart.

Step 5: Test It Out

To check if Apache recognizes Python, create a PHP file in your web root folder (usually D:/laragon/www/). Name it test.py.php and add this code:

<?php
$output = [];
exec('python --version', $output);
echo implode("\n", $output);
?>

Open this file in your browser, e.g., http://localhost/test.py.php. If everything is set up correctly, you’ll see the Python version displayed.

Conclusion

Congratulations! You’ve successfully added Python to Laragon’s Apache environment. Now you can run Python scripts directly through Apache. If this guide helped you, share it with your fellow programmers—it might save them a lot of time!

Git Commands Cheat Sheet

Git is an essential tool for version control, used by developers worldwide to manage code and track changes across projects. Here’s a cheat sheet to help you get started with Git commands. Keep this handy reference to streamline your workflow!

1. Initialize a New Git Repository

To start using Git in a project, you’ll first need to initialize a new repository. This command sets up the Git repository in your project folder:

git init

2. Set Up Your Username and Email

Before you start making commits, configure Git with your username and email to identify changes made by you:

git config --global user.name "<your-name>"
git config --global user.email "<your-email>"

3. Clone an Existing Repository

If you want to work on a project already hosted in a Git repository, you can clone it to your local machine:

git clone <repository-url>

4. Add Files to the Staging Area

To stage changes (prepare them for a commit), add files to the staging area. For a specific file, use:

git add <file>

Or, to add all files and changes:

git add .

5. Check for Unstaged Changes

To see the differences between your working directory and the last commit, use:

git diff

6. Commit Staged Changes

After staging changes, you’ll want to commit them. Include a meaningful message to describe the commit:

git commit -m "Message"

7. Reset the Staging Area

If you need to remove changes from the staging area and return to the last commit, use:

git reset

8. Check the Repository Status

To see the state of your working directory and staging area, including untracked files and pending changes, run:

git status

9. Remove a File from the Index and Working Directory

To delete a file from both the index and the working directory, use:

git rm <file>

10. View the Commit History

To see a list of past commits, use:

git log

11. View Commit Metadata

To see details about a specific commit, including changes made, run:

git show <commit-hash>

12. Manage Branches

Git allows you to work on separate branches to manage different versions or features of a project.

  • List all branches: git branch
  • Create a new branch: git branch <branch-name>
  • Rename the current branch: git branch -m <new-branch-name>
  • Delete a branch: git branch -d <branch-name>
  • Switch to another branch: git checkout <branch-name>

13. Merge Branches

To merge the changes from another branch into the current branch:

git merge <branch-name>

14. Work with Remote Repositories

Collaborating with others often involves connecting to remote repositories.

  • Add a remote connection: git remote add <name> <repository-url>
  • Push changes to a remote repository: git push <remote> <branch>
  • Pull changes from a remote repository: git pull <remote>

15. Clean Up with Git Garbage Collection

Remove unnecessary files and optimize your local repository:

git gc

16. Stash Changes

Temporarily set aside uncommitted changes without committing them. Use stash to save your work temporarily and apply it later.

  • Stash changes: git stash
  • Apply the most recent stash: git stash apply

This cheat sheet provides a quick overview of essential Git commands to keep your work organized, efficient, and versioned. With these commands, you can manage and collaborate on projects with ease! Happy coding!

WooCommerce JavaScript Events

WooCommerce, the popular eCommerce plugin for WordPress, offers a variety of JavaScript events that developers can utilize to create dynamic, responsive user experiences. These events allow developers to hook into different points of the WooCommerce lifecycle, from the cart page to the checkout process and beyond. Understanding and using these events can significantly enhance the functionality of a WooCommerce store.

WooCommerce Checkout JavaScript Events

During the checkout process, several JavaScript events are triggered to manage different stages and actions. Here’s a list of key checkout events:

1. init_checkout: Triggered when the checkout process initializes.

$( document.body ).trigger( 'init_checkout' );

2. payment_method_selected: Triggered when a payment method is selected.

$( document.body ).trigger( 'payment_method_selected' );

3. update_checkout: Triggered when the checkout needs to be updated.

$( document.body ).trigger( 'update_checkout' );

4. updated_checkout: Triggered after the checkout has been updated.

$( document.body ).trigger( 'updated_checkout' );

5. checkout_error: Triggered when there is an error during checkout.

$( document.body ).trigger( 'checkout_error' );

WooCommerce Cart Page JavaScript Events

The cart page also has specific events that can be used to manage various interactions and updates:

1. wc_cart_emptied: Triggered when the cart is emptied.

$( document.body ).trigger( 'wc_cart_emptied' );

2. update_checkout: Same as the checkout page, used to update the checkout process from the cart page.

$( document.body ).trigger( 'update_checkout' );

3. updated_wc_div: Triggered when the cart’s DOM elements are updated.

$( document.body ).trigger( 'updated_wc_div' );

4. updated_cart_totals: Triggered when the cart totals are updated.

$( document.body ).trigger( 'updated_cart_totals' );

5. country_to_state_changed: Triggered when the country selection changes the state options.

$( document.body ).trigger( 'country_to_state_changed' );

6. updated_shipping_method: Triggered when the shipping method is updated.

$( document.body ).trigger( 'updated_shipping_method' );

7. applied_coupon: Triggered when a coupon is applied.

$( document.body ).trigger( 'applied_coupon', [ coupon_code ] );

8. removed_coupon: Triggered when a coupon is removed.

$( document.body ).trigger( 'removed_coupon', [ coupon ] );

WooCommerce Single Product Page JavaScript Events

For single product pages, events are triggered to manage the initialization and interactions of product tabs and ratings:

1. init: Triggered when the single product tabs or ratings are initialized.

$( '.wc-tabs-wrapper, .woocommerce-tabs, #rating' ).trigger( 'init' );

WooCommerce Add to Cart JavaScript Events

Adding products to the cart involves several events to manage the process:

1. adding_to_cart: Triggered when a product is being added to the cart.

$( document.body ).trigger( 'adding_to_cart', [ $thisbutton, data ] );

2. added_to_cart: Triggered after a product is added to the cart.

$( document.body ).trigger( 'added_to_cart', [ response.fragments, response.cart_hash, $thisbutton ] );

3. removed_from_cart: Triggered when a product is removed from the cart.

$( document.body ).trigger( 'removed_from_cart', [ response.fragments, response.cart_hash, $thisbutton ] );

4. wc_cart_button_updated: Triggered when the cart button is updated.

$( document.body ).trigger( 'wc_cart_button_updated', [ $button ] );

5. cart_page_refreshed: Triggered when the cart page is refreshed.

$( document.body ).trigger( 'cart_page_refreshed' );

6. cart_totals_refreshed: Triggered when the cart totals are refreshed.

$( document.body ).trigger( 'cart_totals_refreshed' );

7. wc_fragments_loaded: Triggered when WooCommerce fragments are loaded.

$( document.body ).trigger( 'wc_fragments_loaded' );

WooCommerce Add Payment Method JavaScript Events

Managing the addition of new payment methods is streamlined with specific events:

1. init_add_payment_method: Triggered when the add payment method process initializes.

$( document.body ).trigger( 'init_add_payment_method' );

Binding Event Listeners

To effectively use these events, you can bind listeners to them. Here’s a general approach:

jQuery('<event_target>').on('<event_name>', function(){
  console.log('<event_name> triggered');
});

Example

For instance, to trigger an update to the checkout process when the billing state changes:

$('body').on('change', '#billing_state', function(){
  $( document.body ).trigger( 'update_checkout' );
});

Conclusion

By leveraging WooCommerce’s extensive list of JavaScript events, developers can create more interactive and dynamic eCommerce sites. These events provide hooks into various stages of the WooCommerce lifecycle, enabling custom behaviors and enhancing the user experience. Whether updating the cart totals, initializing the checkout process, or managing payment methods, understanding and using these events is key to optimizing a WooCommerce store.

How to Make a Horizontally and Vertically Centered Div

Creating a website is fun, but for people who are used to working on the backend, sometimes it can be frustrating when they have to make centered div. This time, I want to share 3 methods to center a div.

Using FlexBox

.container-1 {
    height: 20vh;
    border: 1px solid red;
    display: flex;
    justify-content: center;
    align-items: center;
}

Hello…!!!

Using Grid

.container-2 {
    height: 20vh;
    border: 1px solid red;
    display: grid;
    place-items: center;
}

Hello…!!!

Using Absolut Positioning

.container-3 {
    position: relative;
    border: 1px solid red;
    height: 20vh;
}

.container-3 p {
    position: absolute;
    top: 50%;
    left: 50%;
    transform: translate(-50%, -50%);
    margin: 0;
}

Hello…!!!

Which one is your favorite? Please leave a comment.

WooCommerce Plugin for Adding Custom Tab to All Products

Are you tired of the tedious and time-consuming process of adding custom tabs to your WooCommerce products one by one? I understand the pain, and that’s why I present to you the ultimate solution: WooCommerce Custom Product Tabs!

<?php
/*
Plugin Name: WooCommerce Custom Product Tab
Plugin URI: https://ryanaby.com/woocommerce-plugin-for-adding-custom-tab-to-all-products/
Description: Add tab to all WooCommerce products
Version: 1.0
Author: Ryan Aby
Author URI: https://ryanaby.com/
*/

if ( ! class_exists( 'WCPT_Custom_Product_Tab' ) ) {
    class WCPT_Custom_Product_Tab {

        public function __construct() {
            add_filter( 'woocommerce_settings_tabs_array', array( $this, 'add_settings_tab' ), 50, 1 );
            add_action( 'woocommerce_settings_tabs_wcpt_custom_tab', array( $this, 'settings_tab' ) );
            add_action( 'woocommerce_update_options_wcpt_custom_tab', array( $this, 'update_settings' ) );

            // Add custom tab to product pages
            add_filter( 'woocommerce_product_tabs', array( $this, 'add_custom_tab' ) );
        }

        public function add_settings_tab( $tabs ) {
            $tabs['wcpt_custom_tab'] = esc_html__( 'Custom Product Tab', 'woocommerce-custom-product-tab' );
            return $tabs;
        }

        public function settings_tab() {
            woocommerce_admin_fields( self::get_settings() );
        }

        public function update_settings() {
            woocommerce_update_options( self::get_settings() );
        }

        public function get_settings() {
            $settings = array(
                'section_title' => array(
                    'name' => esc_html__( 'Custom Product Tabs Settings', 'woocommerce-custom-product-tab' ),
                    'type' => 'title',
                    'desc' => '',
                    'id'   => 'wcpt_custom_tab_section_title'
                ),
            );

            for ( $i = 1; $i <= 3; $i++ ) {
                $settings["custom_tab_title_$i"] = array(
                    'name' => esc_html__( "Custom Tab Title $i", 'woocommerce-custom-product-tab' ),
                    'type' => 'text',
                    'desc' => esc_html__( "Title for Custom Tab $i", 'woocommerce-custom-product-tab' ),
                    'id'   => "wcpt_custom_tab_title_$i",
                );

                $settings["custom_tab_content_$i"] = array(
                    'name' => esc_html__( "Custom Tab Content $i", 'woocommerce-custom-product-tab' ),
                    'type' => 'textarea',
                    'desc' => esc_html__( "Content for Custom Tab $i", 'woocommerce-custom-product-tab' ),
                    'id'   => "wcpt_custom_tab_content_$i",
                    'css'  => 'height: 150px;',
                );
            }

            $settings['section_end'] = array(
                'type' => 'sectionend',
                'id'   => 'wcpt_custom_tab_section_end',
            );

            return apply_filters( 'wcpt_wcpt_custom_tab_settings', $settings );
        }

        public function add_custom_tab( $tabs ) {
            for ( $i = 1; $i <= 3; $i++ ) {
                $custom_tab_title = get_option( "wcpt_custom_tab_title_$i", '' );
                $custom_tab_content = get_option( "wcpt_custom_tab_content_$i", '' );

                if ( ! empty( $custom_tab_title ) ) {
                    $tabs["wcpt_custom_tab_$i"] = array(
                        'title'    => esc_html( $custom_tab_title ),
                        'priority' => 50 + $i,
                        'callback' => function () use ( $custom_tab_content ) {
                            echo '<div class="wcpt-custom-tab-content">' . apply_filters( 'the_content', $custom_tab_content ) . '</div>';
                        },
                    );
                }
            }

            return $tabs;
        }
    }

    new WCPT_Custom_Product_Tab();
}